This a step-by-step guide on how to create a Kubernetes cluster on top of AWS infrastructure and how to run a simple application in it. I've tried to make it simple and clear, specially for beginners.
This is what we need before we start:
- AWS admin account
- A domain
We need a domain because the cluster's name must be a valid DNS name. I'm going to use brunocalza.me domain and k8s.brunocalza.me as the cluster's name. We'll be running the commands on a Ubuntu 16.10 machine. Links for others environments will be provided.
Installing KOPS
Kubernetes offers a simple tool, called kops, that makes the creation of our cluster very easy. Let's install it.
curl -LO https://github.com/kubernetes/kops/releases/download/1.5.1/kops-linux-amd64
chmod +x kops-linux-amd64
sudo mv kops-linux-amd64 /usr/local/bin/kops
We can see it from the url the we installed kops 1.5.1 (currently the latest version). You can download any version by changing that. Here we can check all the releases available. We can also check what is changing from version to version.
Setting the AWS environment
We need, basically, two resources created on AWS before we can create our cluster. We're going to use the aws command line for creating them, so make sure you have it by following Installing the AWS Command Line Interface.
The first resource is a S3 bucket responsible for storing the cluster configuration file. From docs:
kops lets you manage your clusters even after installation. To do this, it must keep track of the clusters that you have created, along with their configuration, the keys they are using etc. This information is stored in an S3 bucket
I'll create a S3 bucket named brunocalza-k8s-state. Since bucket's name are global, you should pick a different name.
aws s3api create-bucket --bucket brunocalza-k8s-state --region us-east-1
The second resource is a hosted zone for the domain we want our cluster running on. The reason we need a domain can be found on docs, as follows:
kops uses DNS for discovery, both inside the cluster and so that you can reach the kubernetes API server from clients.
kops has a strong opinion on the cluster name: it should be a valid DNS name. By doing so you will no longer get your clusters confused, you can share clusters with your colleagues unambiguously, and you can reach them without relying on remembering an IP address.
Since my cluster's name is k8s.brunocalza.me, the command to create a hosted zone is
ID=$(uuidgen) && aws route53 create-hosted-zone --name k8s.brunocalza.me --caller-reference $ID
This is going to automatically create a name server (NS) record that identifies four name servers. We can check these four names servers in the response of the above command.
{
    "HostedZone": {
        "ResourceRecordSetCount": 2,
        "CallerReference": "48d8c9ca-55ee-4e9e-9280-a3ac4cc21527",
        "Config": {
            "PrivateZone": false
        },
        "Id": "/hostedzone/Z2DHV8JMRBMA9X",
        "Name": "k8s.brunocalza.me."
    },
    "DelegationSet": {
        "NameServers": [
            "ns-1520.awsdns-62.org",
            "ns-1761.awsdns-28.co.uk",
            "ns-88.awsdns-11.com",
            "ns-740.awsdns-28.net"
        ]
    },
    "Location": "https://route53.amazonaws.com/2013-04-01/hostedzone/Z2DHV8JMRBMA9X",
    "ChangeInfo": {
        "Status": "PENDING",
        "SubmittedAt": "2017-03-08T00:23:41.512Z",
        "Id": "/change/C3KFK9YH4ZCA3X"
    }
}
They can be found inside DelegationSet.NameServers. Otherwise, we can check it by logging into AWS Console and going to Route S3.
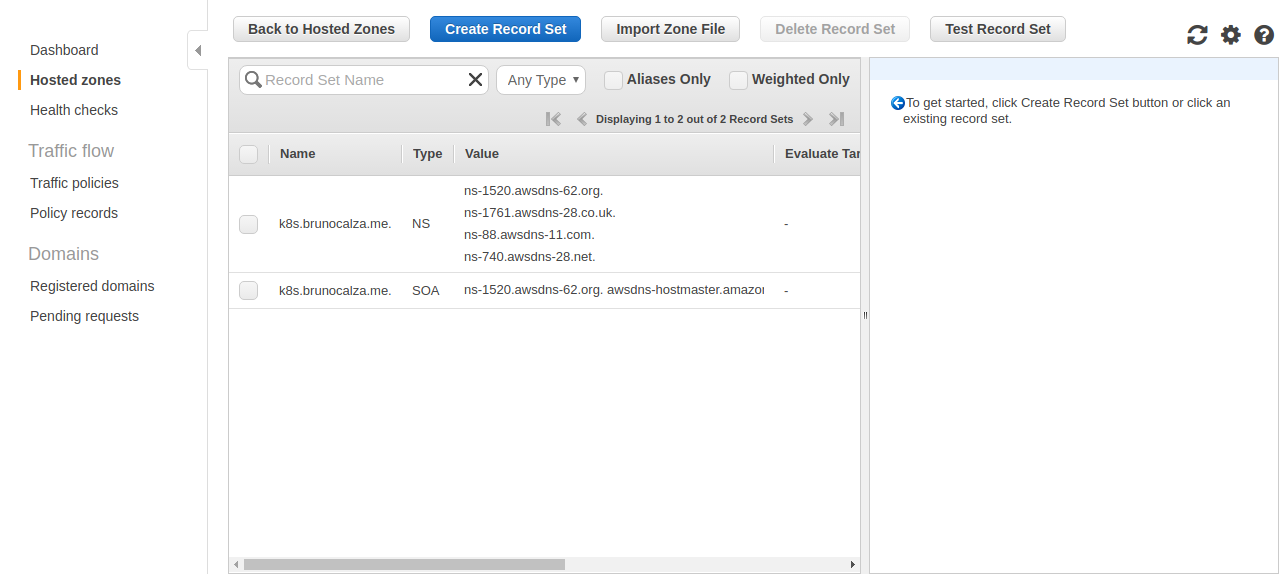
These name servers are going to be responsible for resolving our cluster's domain name. You have give it to your registrar or your DNS service so that DNS queries can be routed to Amazon Route 53 name servers.
Setting up DNS
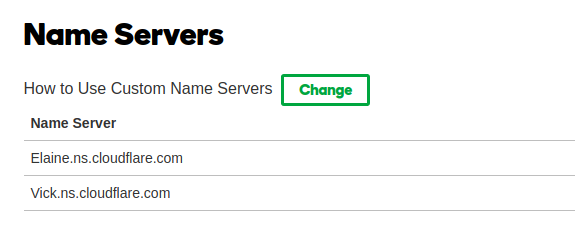
We already have our hosted zone created on AWS and with it our name servers that will be responsible for resolving our cluster domain name. Now we have to make sure our domain can be resolved. The brunocalza.me is registered by GoDaddy but I'm using a Cloudflare as DNS service. Because of this, on GoDaddy I need to setup the name servers responsible for resolving brunocalza.me, like these:
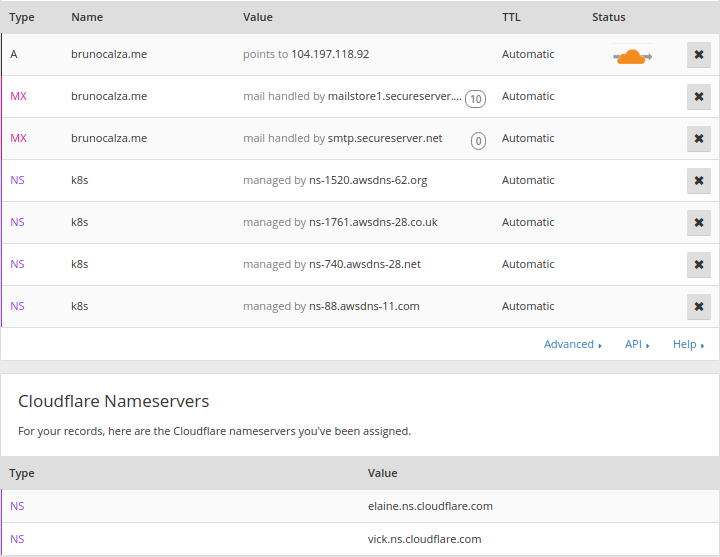
On Cloudflare I needed to create the A record responsible for resolving brunocalza.me and the NS records that will responsible for resolving k8s.brunocalza.me. We can see that brunocalza.me points to the machine's IP address that my blog is running on. AWS we'll be responsible for resolving k8s.brunocalza.me. This is my setup:
You probably have registered your domain with a different registrar or you're using a different DNS service provider, but you should be able to do something similar to what I've done.
We can check that everything work out correctly by digging our domain
dig ns k8s.brunocalza.me
The answer section must return the AWS name servers (it may take awhile)
;; ANSWER SECTION:
k8s.brunocalza.me.    300 IN  NS  ns-88.awsdns-11.com.
k8s.brunocalza.me.    300 IN  NS  ns-1520.awsdns-62.org.
k8s.brunocalza.me.    300 IN  NS  ns-740.awsdns-28.net.
k8s.brunocalza.me.    300 IN  NS  ns-1761.awsdns-28.co.uk.
This step is critical for a fully functional Kubernetes cluster. Do not move on until you're sure you have validated your NS records.
Creating the cluster
We're ready to create our cluster. Remember our tool kops? It's time to use it. We need just to set two environment variables before using kops.
export NAME=k8s.brunocalza.me
export KOPS_STATE_STORE=s3://brunocalza-k8s-state
We're good to go. We'll start by creating the configuration of our cluster. Most of our cluster's config will be the default ones. Let's run
kops create cluster --zones us-east-1a ${NAME}
This command created the config file that is saved on S3. This file can be downloaded and edited by running
kops edit cluster ${NAME}
Use the above command to make sure we're using Kubernetes 1.5.3 version. Edit the file if needed. To build our cluster, let's run
kops update cluster ${NAME} --yes
It may take awhile but in a few minutes your cluster should be up and running. Let's check how many our EC2 instances on AWS console.

Here's a few things kops did for us behind the scenes:
- kops created for us one master node and two slaves. This is the default config for kops. You can change it by setting
--node-countparameter. It also selected, by default, the size of both master and slaves nodes. If you want a different size you must specify by setting--node-sizeand--master-size - kops created two autoscaling groups on AWS, so if any of the nodes fails, a new one will take its place

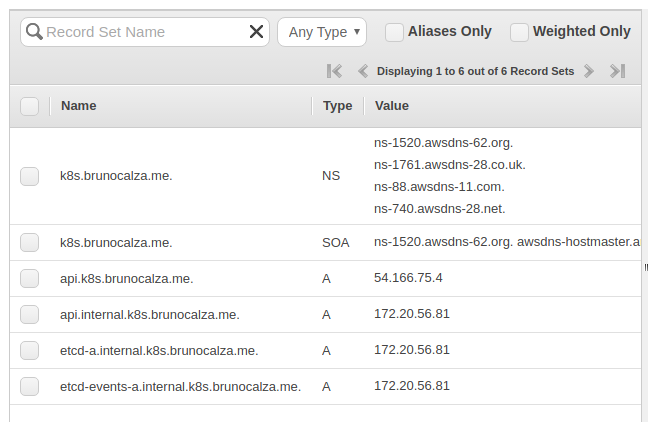
- kops created four more DNS records to make all components of our cluster fully resolvable
- kops copied the
id_rsa.pubpublic key and put it as authorized key in all nodes. We can ssh into any machine doingssh admin@ec2-54-146-180-163.compute-1.amazonaws.com
Interacting with the cluster
Kubernetes provide a tool called kubectl to interact with the cluster. Let's install
curl -LO https://storage.googleapis.com/kubernetes-release/release/1.5.3/bin/linux/amd64/kubectl
chmod +x ./kubectl
sudo mv ./kubectl /usr/local/bin/kubectl
We're installing here the version 1.5.3. You can change it for any available version. Just make sure the server and the client have the same version. You can check both versions by running
kubectl version

Client Version: version.Info{Major:"1", Minor:"5", GitVersion:"v1.5.3",GitCommit:"029c3a408176b55c30846f0faedf56aae5992e9b", GitTreeState:"clean", BuildDate:"2017-02-15T06:40:50Z", GoVersion:"go1.7.4", Compiler:"gc", Platform:"linux/amd64"}

Server Version: version.Info{Major:"1", Minor:"5", GitVersion:"v1.5.3", GitCommit:"029c3a408176b55c30846f0faedf56aae5992e9b", GitTreeState:"clean", BuildDate:"2017-02-15T06:34:56Z", GoVersion:"go1.7.4", Compiler:"gc", Platform:"linux/amd64"}
Let's have some fun and try out some commands. First, we're going to find out some info about the cluster.
kubectl cluster-info

Kubernetes master is running at https://api.k8s.brunocalza.me
KubeDNS is running at https://api.k8s.brunocalza.me/api/v1/proxy/namespaces/kube-system/services/kube-dns
The way we interact with our cluster is through kubectl that makes requests to Kubernetes api server. The first line of the response tells us where the api server is running. The second line tells about the KubeDNS which is a component that provides ways of resoving DNS names inside the cluster.
Let's see what kubectl has to tell us about the nodes by running
kubectl get nodes

NAME                            STATUS         AGE
ip-172-20-36-71.ec2.internal    Ready          34m
ip-172-20-56-81.ec2.internal    Ready,master   36m
ip-172-20-60-254.ec2.internal   Ready          34m
We can get more info about a node by running
kubectl describe node ip-172-20-36-71.ec2.internal
Running our first app on Kubernetes
Running commands to find out more about our cluster is not so fun. We want to run our containerized applications. The quickest way to run an application on Kubernetes is to use the kubectl run command. Let's run a simple hello world app from a image I built and put it on Dockerhub by typing
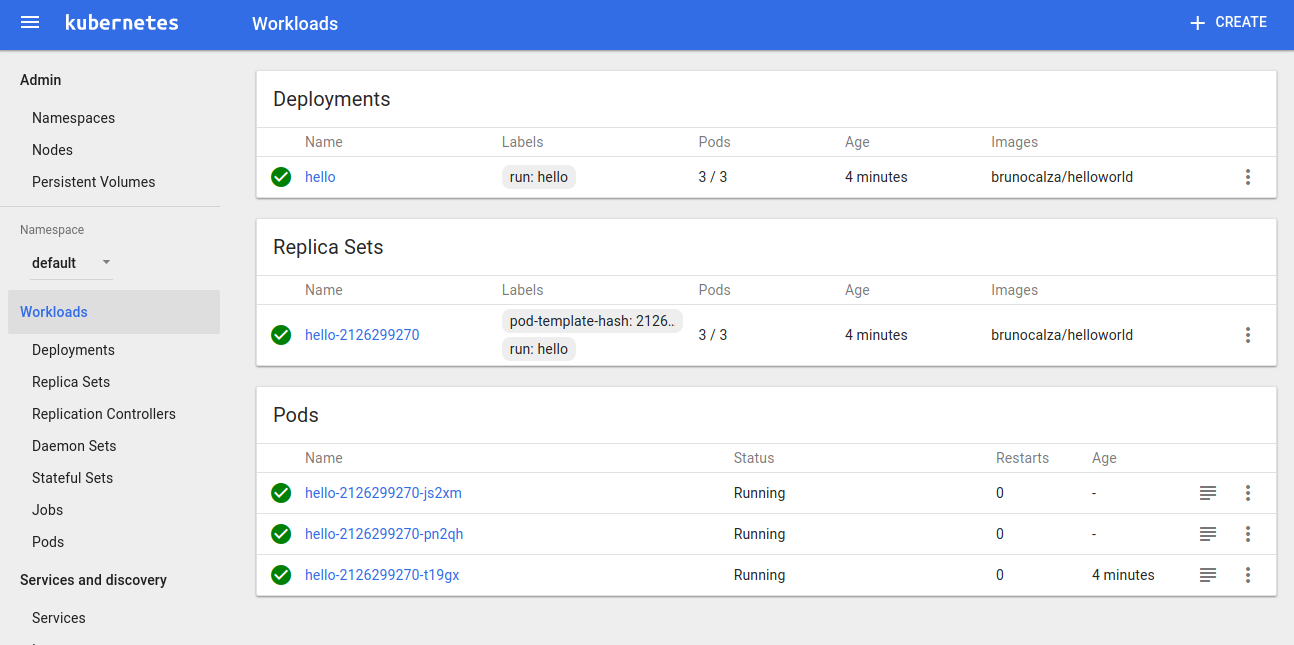
kubectl run hello --image=brunocalza/helloworld --port=8080
deployment "hello" created
This is not the usual way to run applications on Kubernetes. We just did this for simplicity. You should be using yaml or json files together with kubectl create command.
A lot of things happened behind the scenes. Let's just focus on the essentials. Kubernetes works with a concept called pod. A pod is a group of one or more containers that will always run together, and it has its own ip and hostname. The containers inside it will have a feeling that they are in the same machine, while the containers of others pods will appear to be running on a different one.
What happened here is that a pod was created and scheduled to one of the slave nodes. Docker, that is installed on these machines, pulled the image from Dockerhub and started the container inside the pod. We can check our recently created pod by running
kubectl get pods
NAME                     READY     STATUS    RESTARTS   AGE
hello-2126299270-t19gx   1/1       Running   0          12s
Our pod seems to be running fine. We need a way to access it. The way we make it available to the external world is by creating a service. There different kinds of services and ways to access a pod. For simplicity we're going to be using a Load Balancer. Let's create the service.
kubectl expose deployment hello --type=LoadBalancer --name hello-http
service "hello-http" exposed
Let's check it
kubectl get services

NAME         CLUSTER-IP       EXTERNAL-IP   PORT(S)          AGE
hello-http   100.64.162.129   <pending>     8080:31720/TCP   7s
kubernetes   100.64.0.1       <none>        443/TCP          1m
You can see that our recently created service is there, ready to be consumed by its external ip. The external ip is kind of hard to see. We can describe the service to get the full picture
kubectl describe service hello-http

Name:            hello-http
Namespace:        default
Labels:            run=hello
Selector:        run=hello
Type:            LoadBalancer
IP:            100.64.162.129
LoadBalancer Ingress:    a6a64703b068611e7b40c120938f0010-1645341049.us-east-1.elb.amazonaws.com
Port:            <unset> 8080/TCP
NodePort:        <unset> 31720/TCP
Endpoints:        100.96.1.9:8080
Session Affinity:    None
Allright. Let's make our request to our app and see what it happens.
curl a6a64703b068611e7b40c120938f0010-1645341049.us-east-1.elb.amazonaws.com:8080

Hello World!
Our app is running fine on port 8080.
One of the features of Kubernetes is that it can scale our applications very easily. We just need to
kubectl scale --replicas=3 deployment/hello
deployment "hello" scaled
It created 2 more pods, making sure that are 3 identical instances of our applications running.
kubectl get pods
NAME                     READY     STATUS    RESTARTS   AGE
hello-2126299270-js2xm   1/1       Running   0          8s
hello-2126299270-pn2qh   1/1       Running   0          8s
hello-2126299270-t19gx   1/1       Running   0          4m
All threes pods are running under the Load Balancer. So a call to our service may be handled by any of the pods. Make some more calls to the endpoint (we did 10 more requests). Since our app counts the number of requests and log it, we can check how many requests hit each one of our pods by looking at the logs.
kubectl logs hello-2126299270-js2xm
Started server at localhost::8080
Number of requests: 1
Number of requests: 2
Number of requests: 3

kubectl logs hello-2126299270-pn2qh
Started server at localhost::8080
Number of requests: 1
Number of requests: 2
Number of requests: 3

kubectl logs hello-2126299270-t19gx
Started server at localhost::8080
Number of requests: 1
Number of requests: 2
Number of requests: 3
Number of requests: 4
Number of requests: 5
We can see that the requests were distributed among the pods.
Installing the dashboard
Kubernetes offers the Dashboard as a easier way to interact with our cluster. We can get it running by executing
$ kubectl create -f https://rawgit.com/kubernetes/dashboard/master/src/deploy/kubernetes-dashboard.yaml
The Dashboard can be accessed at https://<master>/ui, in my case https://api.k8s.brunocalza.me/ui. The username is admin and the password is can be obtained by kops get secrets kube --type secret -oplaintext.
Here's how it look likes:
Pretty much everything that can be done through kubectl can be done using the Dashboard. We're not going to cover how to use the Dashboard here, but you can move around the try some things out.
Wrapping up
This guide probably helped you understand a little bit of how Kubernetes applications are run on top of AWS. We've learned:
- The tool needed to get a cluster up and running :
kops - How to setup the DNS service to make every component of the cluster resolvable
- How to interact with the cluster using
kubectl - How to run our first application
- How to expose our application
- Some basic concepts of Kubernetes as:
pod,service,deploymentandlogs - How to install a dashboard to make it easier to interact with the cluster
If you don't want your cluster up and running, you can destroy it by running
kops delete cluster ${NAME} --yes
And here are some resources that helped me a lot to write this tutorial: